Wrapping Paper
For our first assignment, we created a wrapping paper pattern using the p5.js library. The pattern I made was inspired by the basic types of weaving patterns: plain, twill, and satin.Implementation
The canvas contains a grid and this grid is made up of 100 grid cells. A warp and a weft thread is drawn on
each grid cell. On the canvas, the warp threads look like vertical rectangles, while the weft threads look like
horizontal
rectangles. Depending on the type of weaving pattern chosen by the user, the warp is either drawn over the weft,
or drawn under the weft. The grid and the threads are objects created from a class called Thread.
The properties of an object created from the Thread class are the index numbers i and
j, the width and height of the grid cell, and the size of the thread.
class Thread {
  constructor(_i, _j) {
    this.i = _i;
    this.j = _j;
    this.cw = cellWidth;
    this.ch = cellHeight;
    this.ts = threadSize;
  }
}
The width and height of the grid cell depend on the width and height of the canvas and the number of grid cells. The following variables are defined globally.
const canvasWidth = 1754;
const canvasHeight = 2481;
let numOfCells = 10;
let cellWidth = canvasWidth / numOfCells;
let cellHeight = canvasHeight / numOfCells;
The following are also global variables that will be used to create the threads.
const colorPalettes = [
  ['#900C3E', '#50163F', '#FF5835', '#A90031'],
  ['#B41D01', '#960000', '#FFCB18', '#FCB600'],
  ['#DB1C1A', '#AE1417', '#3E8B54', '#2E5033'],
  ['#004445', '#011C1D', '#6FB98F', '#2C7873']
];

let colorIndex = [0, 1, 2, 3];
let paletteIndex = 0;
let currentPalette;
let weaveType = 'Plain';
let threadSize = 3;
colorPalettes holds an array of colour palettes for the pattern, each defined as an array of 4 hex
values.
colorIndex holds an array of the index position of the hex values. paletteIndex refers
to the
index position of the colour palette that is used on the canvas. The value stored in paletteIndex
changes
when the user presses the right arrow key. This is one of the ways the user can interact with the sketch.
function keyPressed() {
  if (keyCode === RIGHT_ARROW) {
      paletteIndex = (paletteIndex + 1) % colorPalettes.length;
  }
  redraw();
}
To create the thread objects, I first initialised an empty array to the global variable threads and
the number
of grid cells is set to 10.
let threads = [];
let numOfCells = 10;
I then populated the threads array in setup() with the objects made from the
Thread class.
The array now holds 100 objects.
function setup() {
  createCanvas(canvasWidth, canvasHeight);
  rectMode(CENTER);
  smooth();
  noLoop();

  for (let i = 0; i < numOfCells; i++) {
    for (let j = 0; j < numOfCells; j++) {
        threads.push(new Thread(i, j));
    }
  }
}
In the Thread class, I created a method called render(). When called, this method
draws the grid and the weave
pattern on the canvas. I made use of transformations so that each object made from the Thread class
gets drawn
within the canvas.
In the code snippet below, the render() method draws a square with no fill and has a black outline
on the
canvas. The point of origin is set to the x and y positions of the grid cell, added to half the width and height
of
the grid cell. Those values are added because rectMode is set to CENTER. Without those values, the
objects would be
positioned slightly off the canvas.
render() {
  push();
  let cellX = this.i * this.cw + this.cw / 2;
  let cellY = this.j * this.ch + this.ch / 2;
  translate(cellX, cellY);
  noFill();
  stroke('#000');
  rect(0, 0, this.cw, this.ch);
  pop();
}
Weave is the interlacing of warp and weft threads at right angles in order to produce a woven fabric. To imitate this in p5.js, I started with the simplest of all basic weaves which is the plain weave.
The purpose of the index numbers that are set to the this.i and this.j properties is
so that I can assign each
grid cell with a number and to make sure that the way the warp and weft threads are interlaced on the sketch
will depend
on the type of weave chosen by the user.
Initially, each grid cell were assigned two numbers, but to make the calculations easier, I added these two
numbers
together. For example, if a grid cell's i index number is 1 and its j index number is
also 1 (1, 1) then its index number is 2. In the render() method, I added the following line of
code before pop().
let indexNum = this.i + this.j;
To position the threads in the center of a grid cell, the value set to the this.ts property is
multiplied to 2.
I stored the product in the variable threadPos. This value will be later divided to the height or
width of the grid
cell. Four colours taken from the current colour palette on the canvas are also defined. I added the following
lines
of code after initialising indexNum.
let threadPos = this.ts * 2;
let col1 = currentPalette[colorIndex[0]];
let col2 = currentPalette[colorIndex[1]];
let col3 = currentPalette[colorIndex[2]];
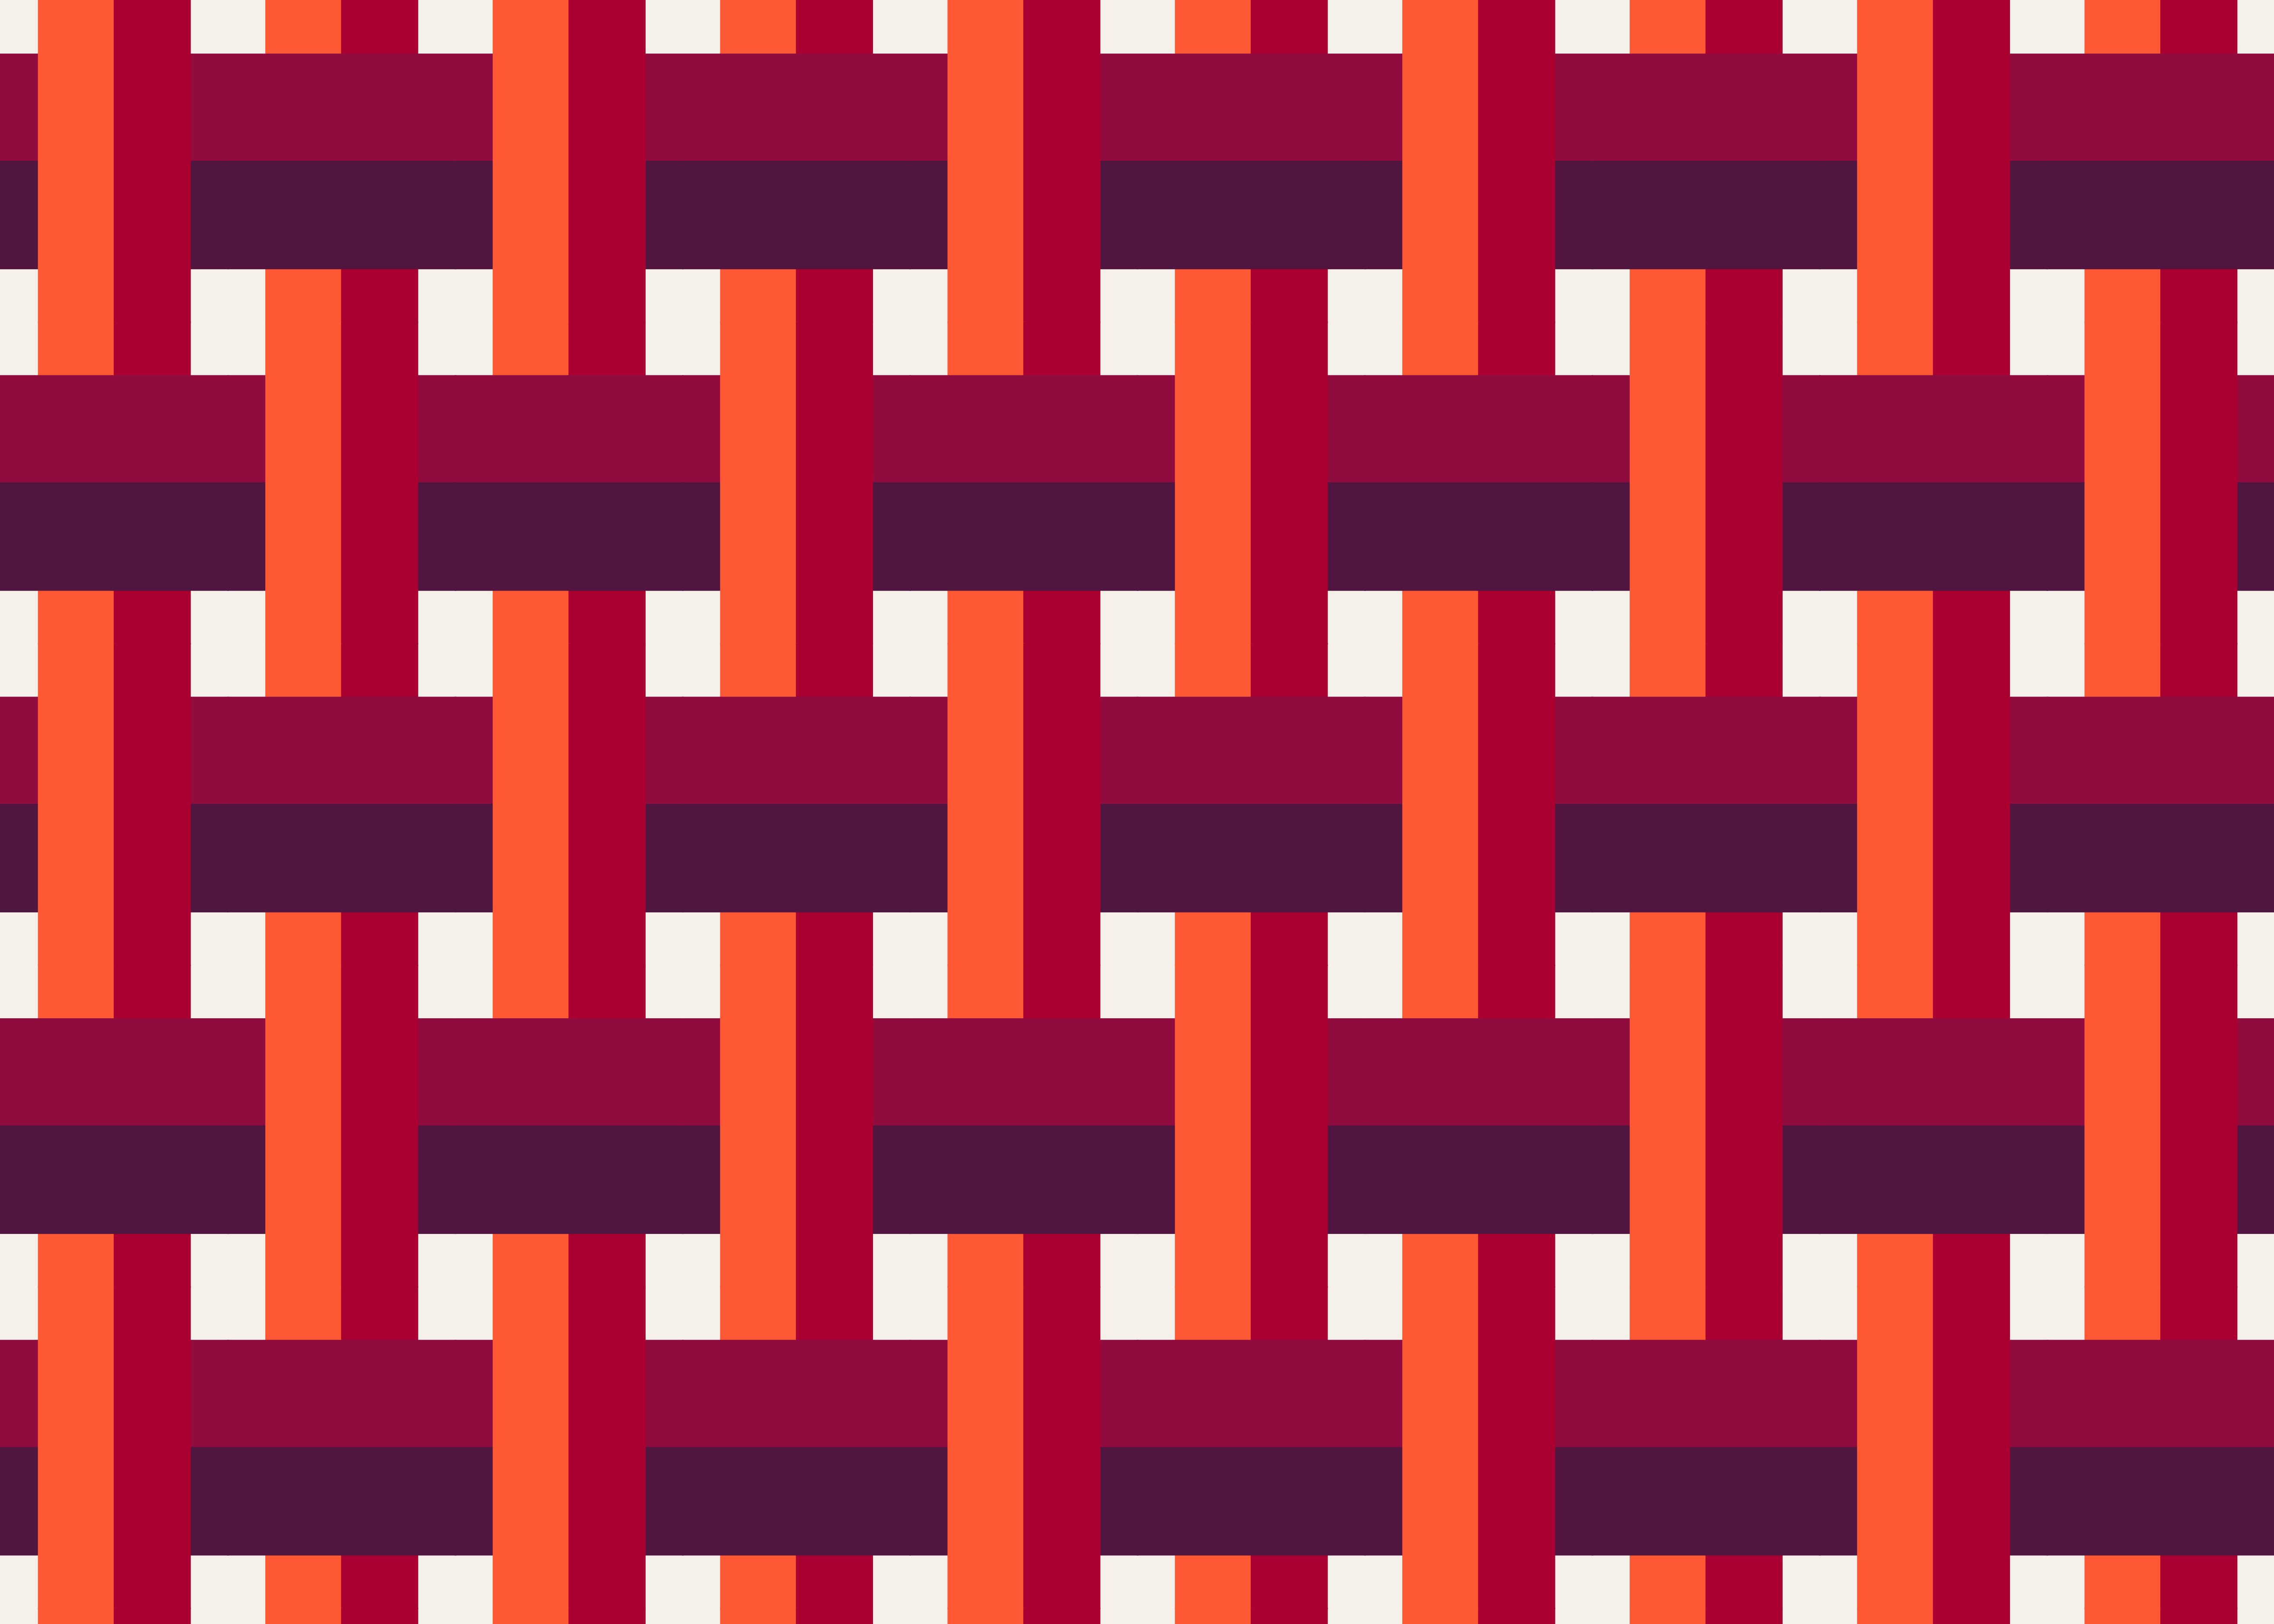
let col4 = currentPalette[colorIndex[3]];The plain weave is made by interlacing warp and weft threads in an alternate manner. To create this pattern, I used conditional statements to check if the index number of a grid cell is an even number. If it is, the warp thread is drawn over the weft thread. Otherwise, the weft thread is drawn over the warp thread.
if (weaveType == 'Plain') {
  // Draw warp over weft
  if (indexNum % 2 == 0) {
      // Weft Threads
      stroke(col1);
      fill(col1);
      rect(0, -this.ch/threadPos, this.cw, this.ch/this.ts);
      stroke(col2);
      fill(col2);
      rect(0, this.ch/threadPos, this.cw, this.ch/this.ts);
      // Warp Threads
      stroke(col3)
      fill(col3);
      rect(-this.cw/threadPos, 0, this.cw/this.ts, this.ch);
      stroke(col4);
      fill(col4);
      rect(this.cw/threadPos, 0, this.cw/this.ts, this.ch);
  // Draw weft over warp
  } else {
      // Warp Threads
      stroke(col3)
      fill(col3);
      rect(-this.cw/threadPos, 0, this.cw/this.ts, this.ch);
      stroke(col4);
      fill(col4);
      rect(this.cw/threadPos, 0, this.cw/this.ts, this.ch);
      // Weft Threads
      stroke(col1);
      fill(col1);
      rect(0, -this.ch/threadPos, this.cw, this.ch/this.ts);
      stroke(col2);
      fill(col2);
      rect(0, this.ch/threadPos, this.cw, this.ch/this.ts);
  }
}
The weft threads are created by placing two rectangles beside each other. The height of the weft thread is set
to the
height of the grid cell divided by the size of the thread. Its y position is set to the height of the grid cell
divided
by the value stored in the threadPos variable earlier. The height and the y position are set this
way to make sure
that the weft thread is horizontally centered in a grid cell. The warp threads are created in a similar way, but
in reverse.
To view the plain weave pattern, I called the render() method on each object created from
the Thread class in the draw() function.
function draw() {
  background(bgColor);
  currentPalette = colorPalettes[paletteIndex];
  threads.forEach(thread => {
      thread.render();
  });
}
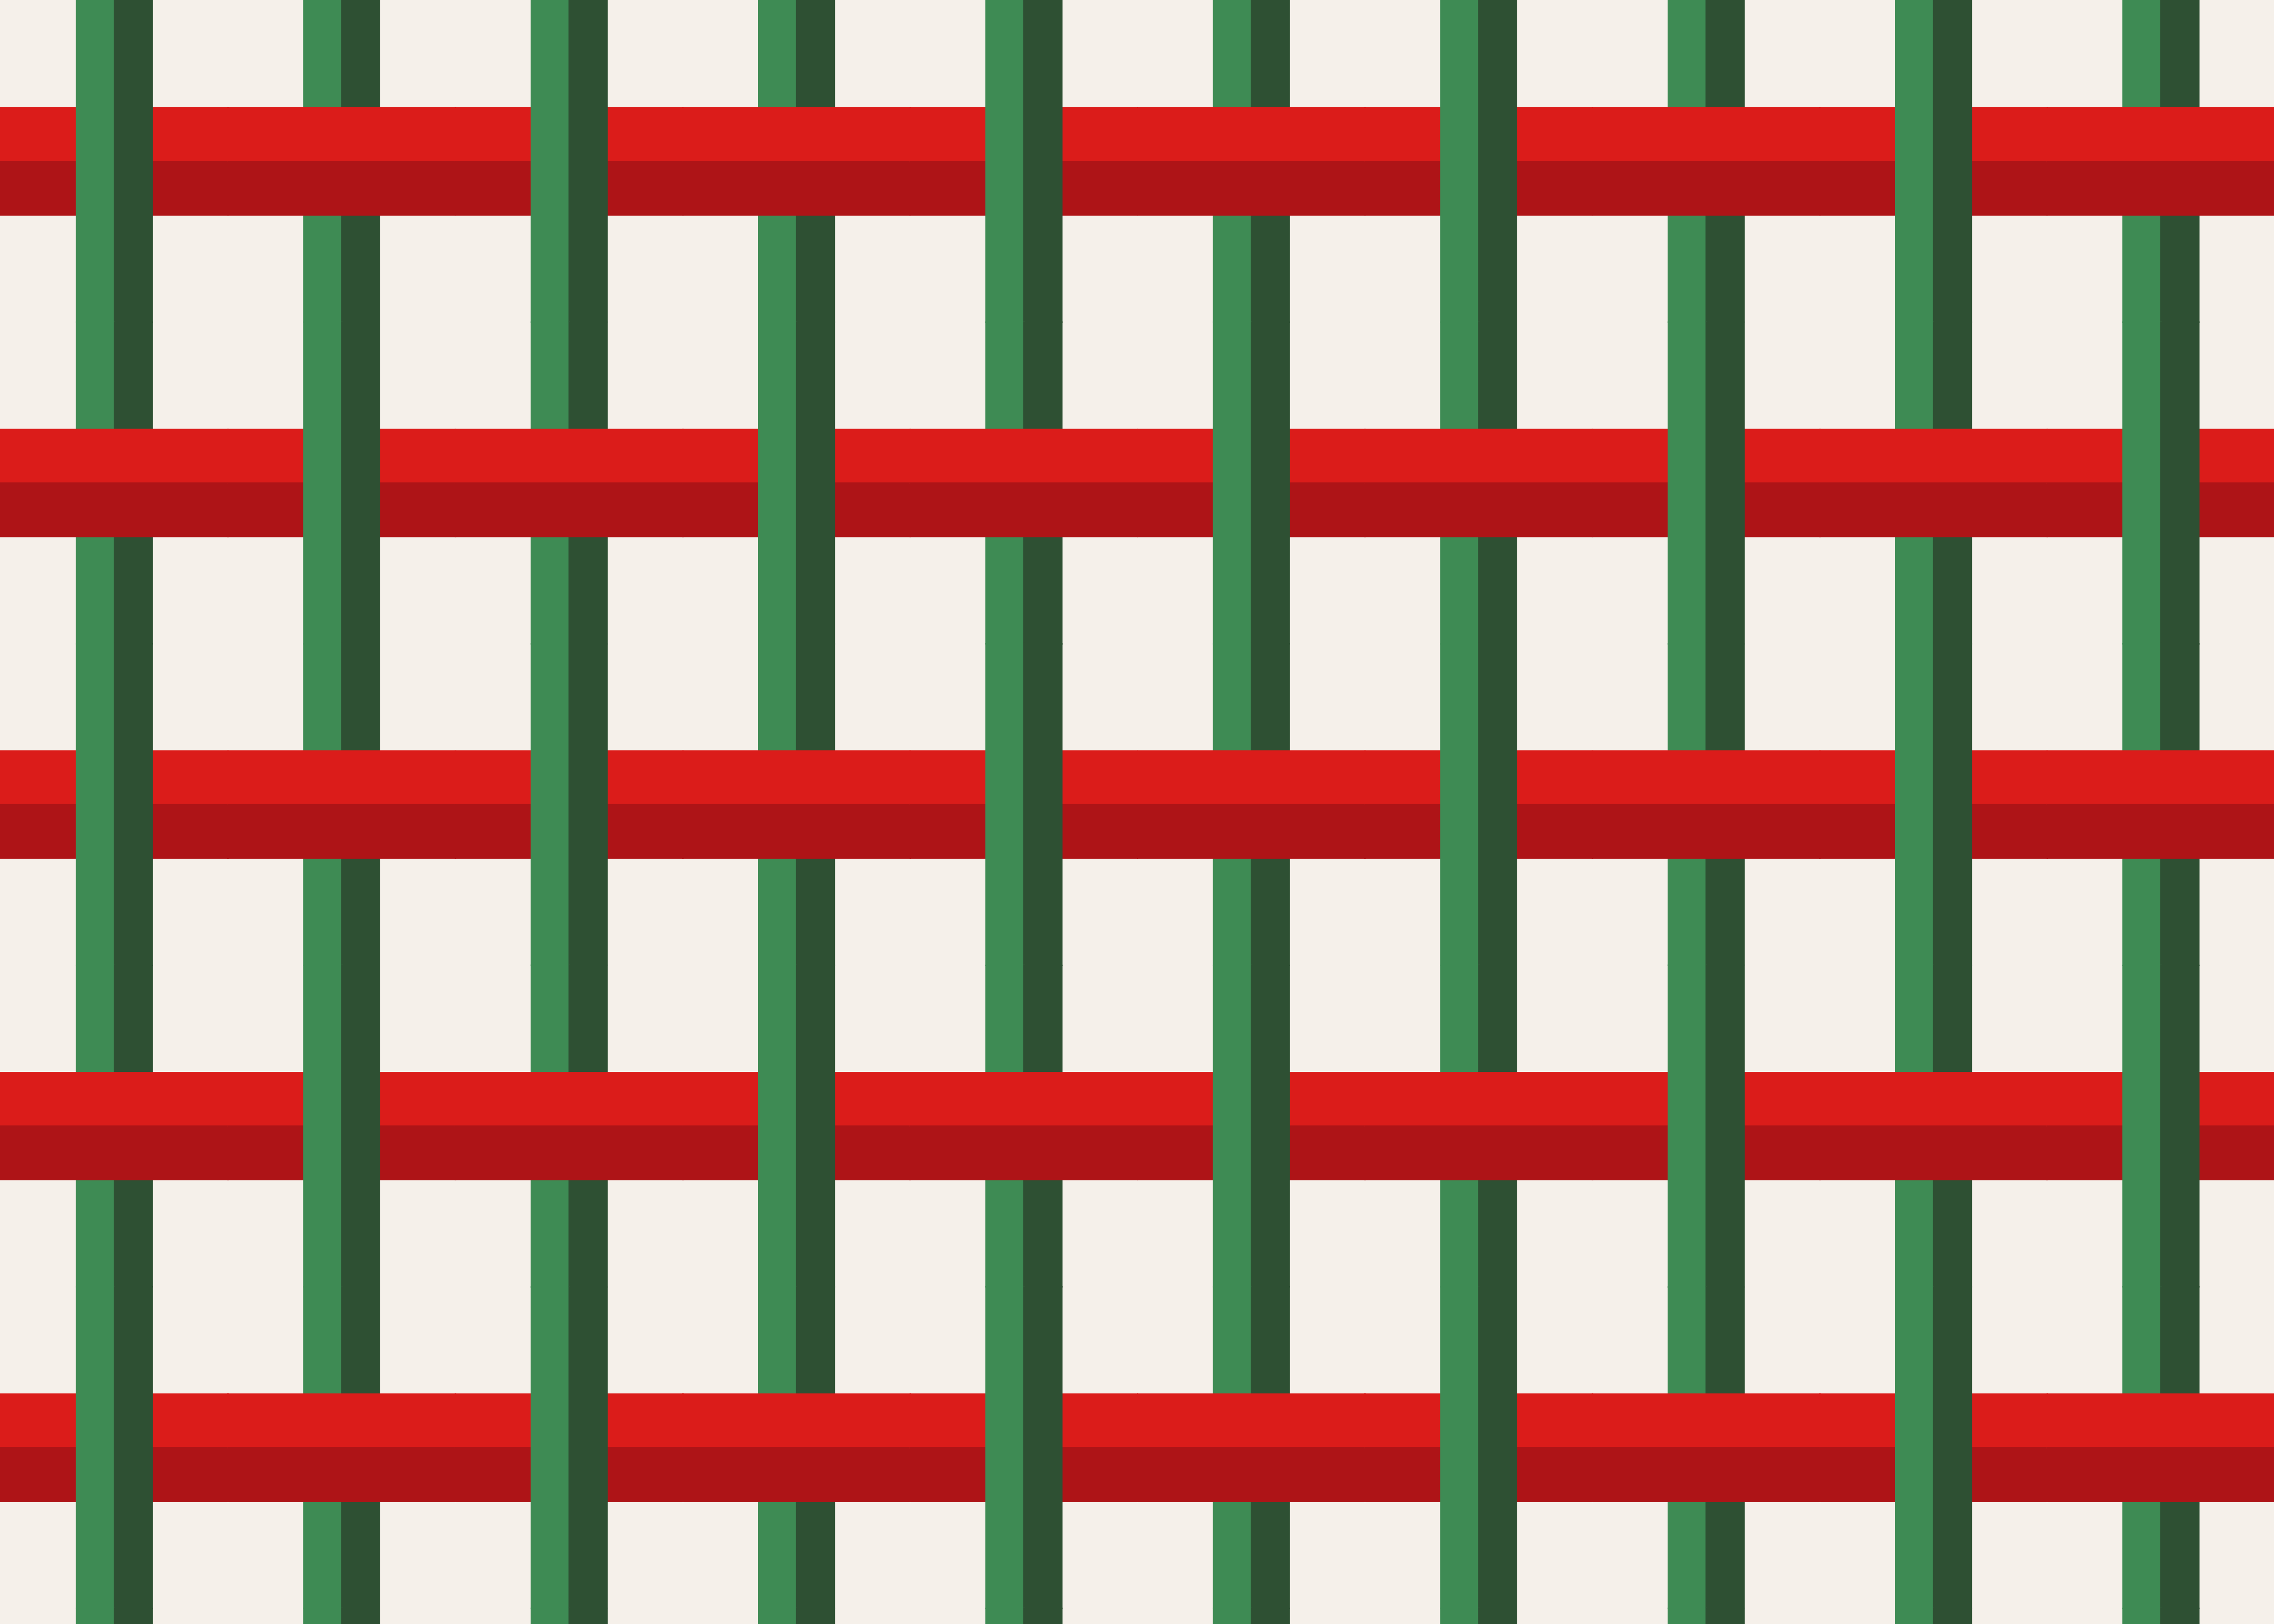
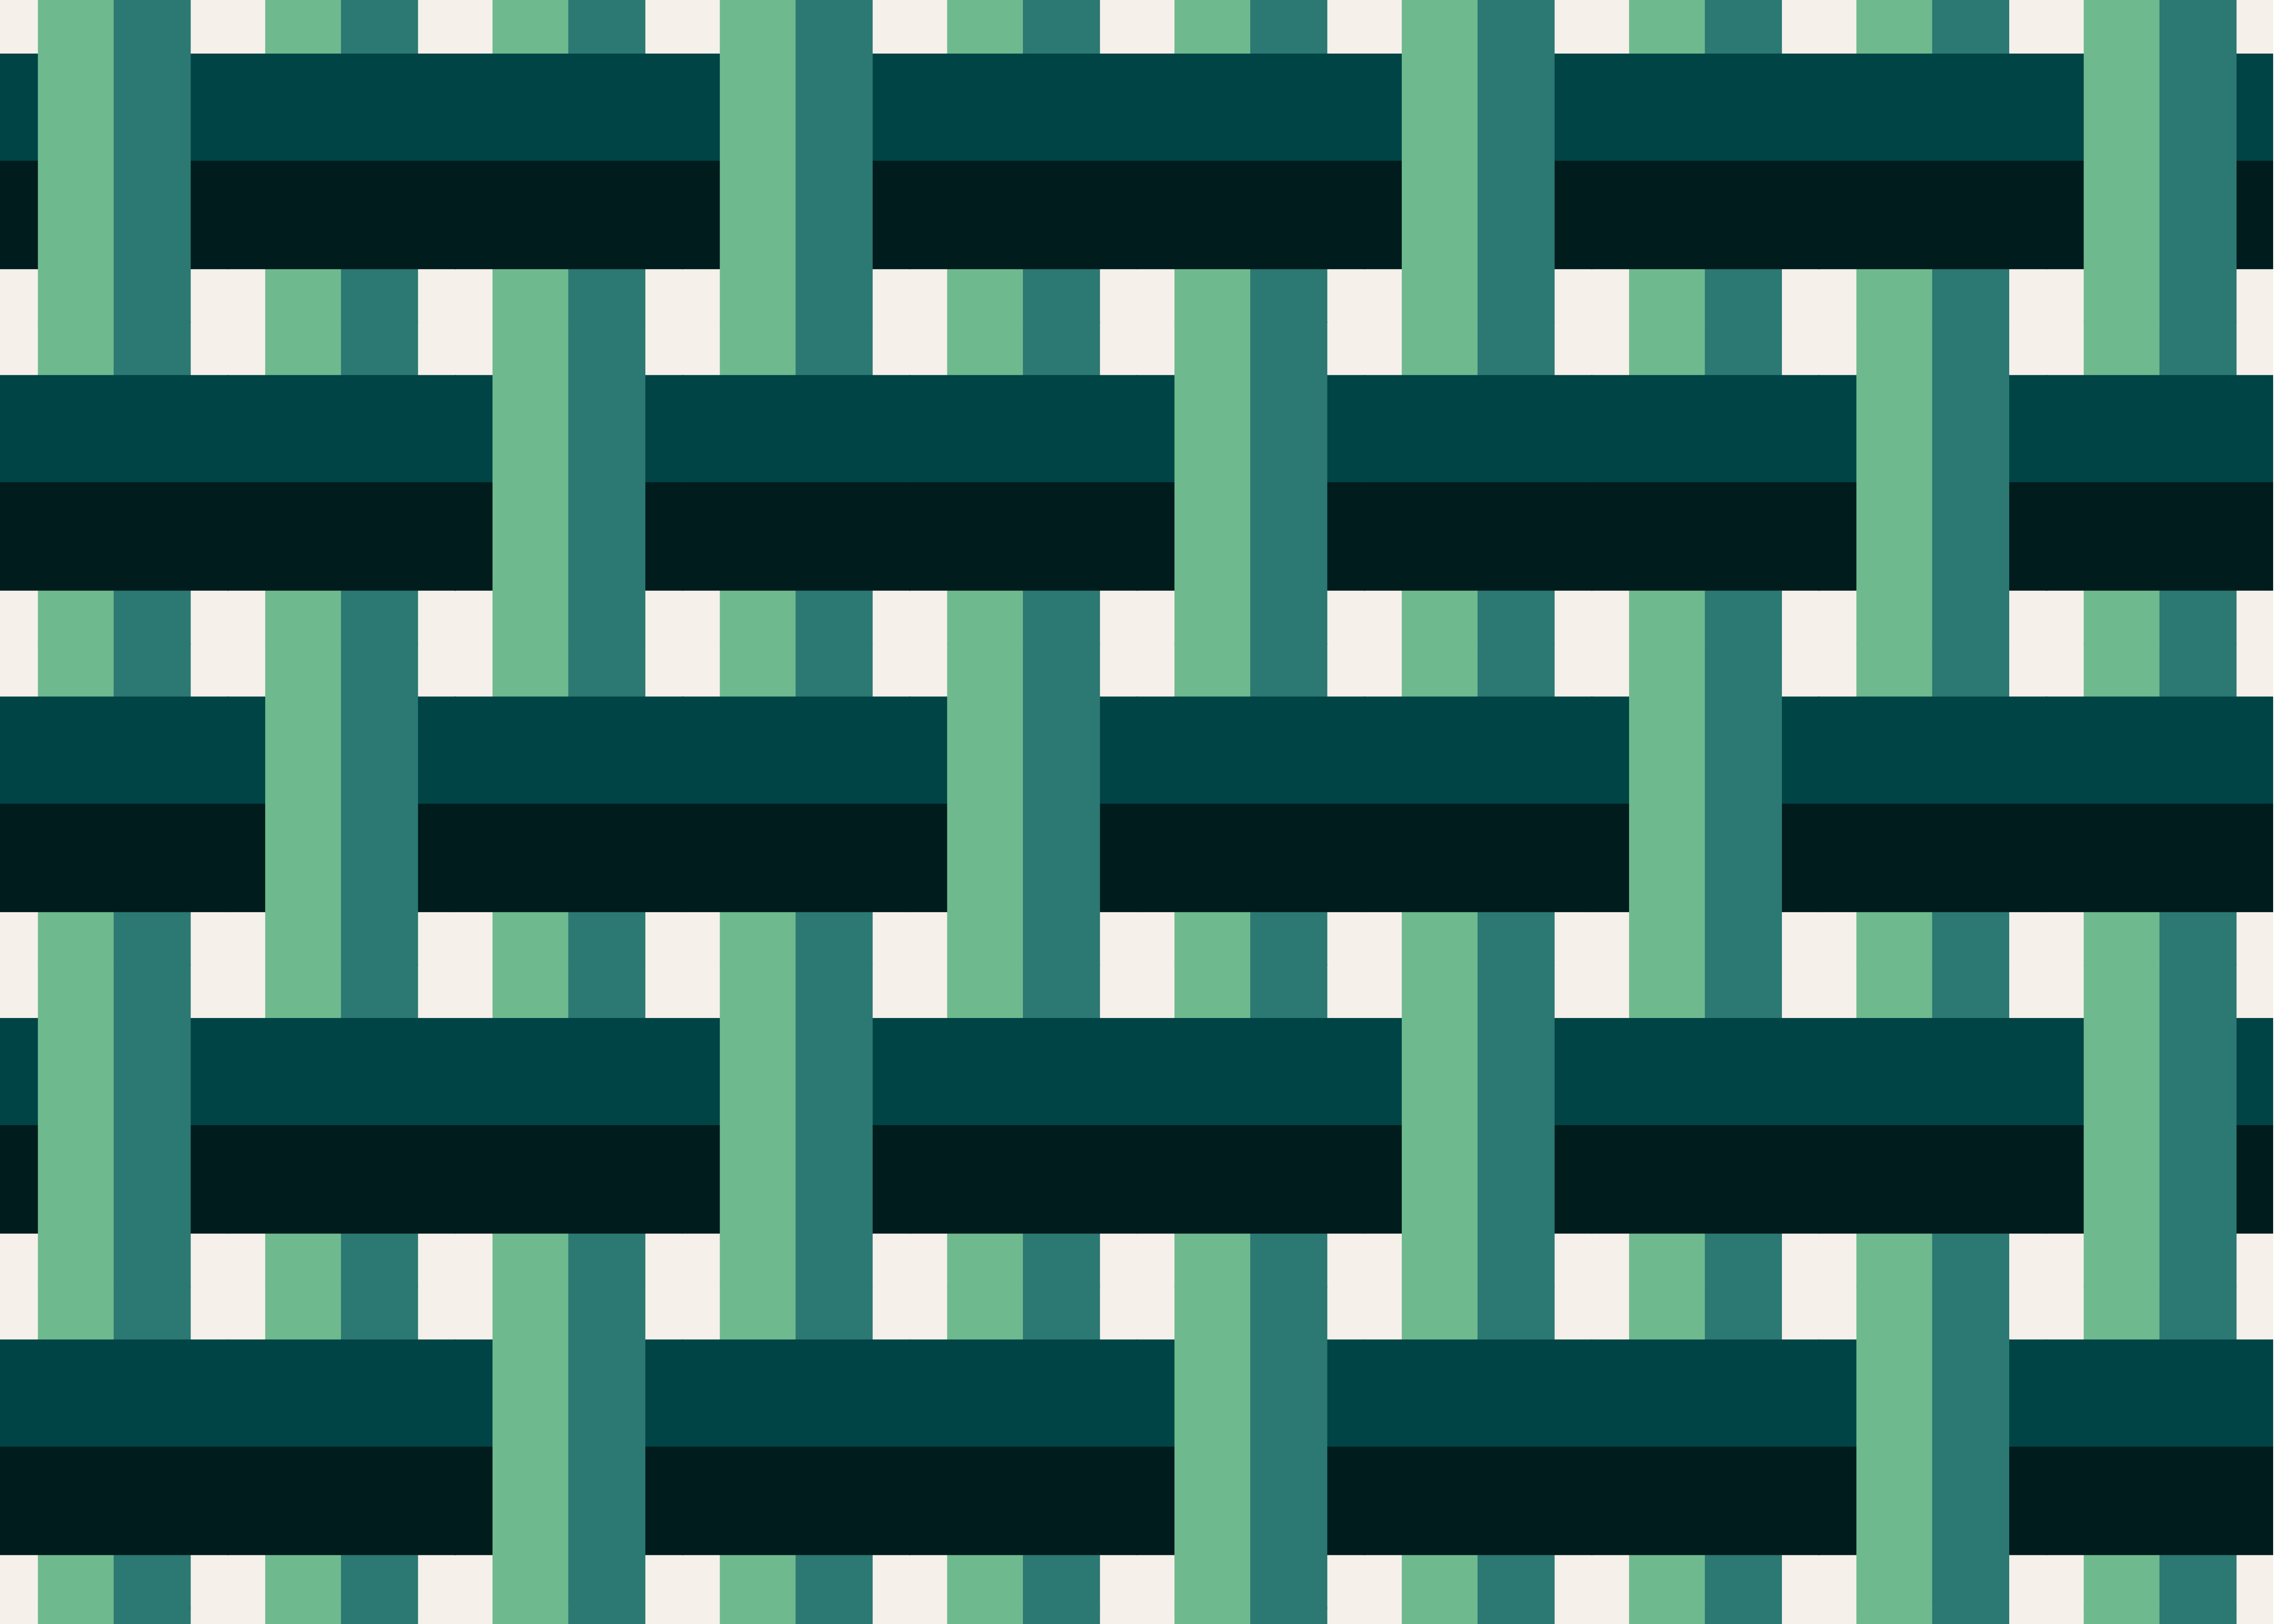
The approach I took to generate a plain weave pattern was repeated to create the twill and satin weave patterns.
To reuse the code, in the class Thread,
I created the method makeWeave() that takes two parameters: _type which refers to the
type of the weave pattern and _num which refers
to the integer the index number will be divided to.
makeWeave(_type, _num) {
  let indexNum = this.i + this.j;
  let threadPos = this.ts * 2;
  let col1 = currentPalette[colorIndex[0]];
  let col2 = currentPalette[colorIndex[1]];
  let col3 = currentPalette[colorIndex[2]];
  let col4 = currentPalette[colorIndex[3]];

  if (weaveType == _type) {
    // Draw warp over weft
    if (indexNum % _num == 0) {
      // Weft Threads
      stroke(col1);
      fill(col1);
      rect(0, -this.ch/threadPos, this.cw, this.ch / this.ts);
      stroke(col2);
      fill(col2);
      rect(0, this.ch/threadPos, this.cw, this.ch / this.ts);
      // Warp Threads
      stroke(col3)
      fill(col3);
      rect(-this.cw/threadPos, 0, this.cw / this.ts, this.ch);
      stroke(col4);
      fill(col4);
      rect(this.cw/threadPos, 0, this.cw / this.ts, this.ch);
    // Draw weft over warp
    } else {
      // Warp Threads
      stroke(col3)
      fill(col3);
      rect(-this.cw/threadPos, 0, this.cw / this.ts, this.ch);
      stroke(col4);
      fill(col4);
      rect(this.cw/threadPos, 0, this.cw / this.ts, this.ch);
      // Weft Threads
      stroke(col1);
      fill(col1);
      rect(0, -this.ch/threadPos, this.cw, this.ch / this.ts);
      stroke(col2);
      fill(col2);
      rect(0, this.ch/threadPos, this.cw, this.ch / this.ts);
    }
  }
}
I then called the makeWeave() method for each weave type in render().
this.makeWeave('Plain', 2);
this.makeWeave('Twill', 3);
this.makeWeave('Satin', 4);
Lastly, I included an interface built using dat.GUI to let the user control the appearance of the weave pattern.
Results
Below are some weave patterns that I made on the program.
What can be improved
To improve this pattern, I would look at better references and let the user have more control over how the threads get drawn on the canvas. I would think of a more effective way than using modulo division to recreate a weave pattern. And to better the aesthetics, I would use better colour palettes and apply shadows. The threads could also be drawn in different ways instead of just horizontally or vertically.